Tips for Pretreating a Dark Shirt for White Ink
Paul Boody
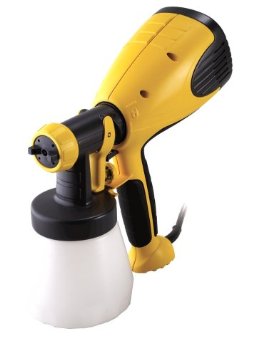
Pre-treatment is quite possible one of the most critical components to the high-quality DTG equation; too little pretreat chemical and your print results will surely suffer, whereas too much pretreat chemical can easily compromise your wash results. In addition to finding the right volume of pretreat for the specific garment you are printing, you must also take steps to minimize fibrillation and reduce “pre-treatment marks” on the garments (you can read more on pre-treatment marks by clicking here).There are many different ways to apply pre-treatment to blank garments, but the most common methods include the use of a Wagner HPLV (“High Pressure Low Volume”) spray gun or some sort of automatic pre-treatment machine.
Some DTG machines, such as the Kornit brand of printers, actually apply the pre-treatment while the shirt is loaded on the machine; there are basically two schools of thought on whether or not this makes sense, with one side advocating for the ease-of-use and reduction in the overall number of steps required to print, and the other side claiming that the inclusion of the pretreat step on the machine actually reduces overall efficiency (since it can’t start printing until the pretreat step is done, causing downtime at the printer) and presents the possibility of a “single point of failure” (if the pre-treatment nozzle becomes compromised or starts acting up, your entire print operation is offline). Personally, I prefer to do the pretreat step off the printer, for a number of reasons: If a Wagner HPLV spray gun starts giving us trouble, we can easily replace it at any time; we even keep extras around at all times, reducing the possibility that we will be stuck without the ability to pretreat shirts.
By pre-treating the garments off the machine, there is no downtime at the printer itself. We simply load up shirts that are ready to be printed, and the printer continues to spit out completed product without delay.
When pretreat is applied on the machine itself, there is no opportunity to heat press the garment to flatten out the fibers and evaporate the excess PT fluid – this reduces the overall clarity in the print, and can leave room for fibers to stick up after the pretreat is applied. Watch a video on Pretreating Technique provided by DTG Print Solutions
Having said that, here is the basic method to pretreat garments (using a standard Wagner HPLV sprayer). In the following example we were pre-treating a standard black t-shirt for a left chest DTG print:
 HEAT PRESS THE GARMENT: Before pre-treating any garments, it is a good idea to heat press them to flatten out any loose fibers that might ruin your awesome DTG print. We set our heat press to 340 degrees Fahrenheit and pre-press each garment for approximately 10-15 seconds (using MEDIUM pressure); you don’t need to press for too long because the garment will be under the heat press another 2-3 times by the end of the production process. Depending on the type of garment you are printing on, you may or may not have to perform this particular step – if you stick to higher quality ring spun cotton (the tighter the knit count, the smoother the print surface) you should see much less fibrillation than you might find with a standard cotton garment.
Additionally, garments that have received an Enzyme wash during manufacturing seem to show far less fibrillation, primarily due to the fact that the Enzyme wash “burns” off most of the rogue fibers before the garment ever leaves the manufacturing facility – ask your garment providers which styles have been treated with an Enzyme wash, and see if that helps your overall printing quality! Also, notice we are using a Stahl’s Hotronix draw press at the moment – we do not currently recommend this particular press due to its lack of an auto-release feature; when things get hectic in the shop, the last thing you want to be doing is chasing down the beeping heat presses – an auto-release press would allow you to leverage your time more effectively, without the fear of accidentally over-curing or forgetting the garment completely. Auto release clam-shell presses are priced very competitively compared to standard clam-shell or draw presses.
 SPRAY THE GARMENT WITH PRETREAT FLUID: After the garment has been pressed, we drape it over a simple shirt board that we made from inexpensive laminate particle wood from the Home Depot. Before you begin pre-treating for the day, it is recommended that you take a few moments to dial in your spray gun – you want an even, gentle spray that doesn’t sputter or spit any wild drops of pretreat fluid all over the place.
The Dupont pretreat fluid is a sticky, corrosive chemical that can easily gum up the spray gun if left unattended for lengthy periods of time (even a few hours could cause a deterioration in spray quality) - to combat this, we typically pour the contents of the spray gun back into the main pretreatment container about every 4 hours; we rinse the gun with warm water, shake the main pretreatment container then reload the gun. Some might say that is overkill, but our results have been far more consistent than they have ever been since we implemented this process… Once we begin spraying the garments, we usually spray “left to right” then “right to left” on the next step down, releasing the trigger on the gun at the far right and far left of each spray; we repeat this until we have gently covered the entire print area with spray, as evenly as possible. If you hold the trigger and simply move the gun back and forth, you will end up with much heavier deposits at the outside edges of the spray area – look for a YouTube video of a professional painting a car with an HPLV sprayer and you can use that as a model for how it should be done.
Once the first coat is done we immediately make another pass (moving left to right and back again, while working our way from top to bottom) – two lighter coats provides more even coverage and allows you to use your judgement on a “garment by garment” basis regarding when enough is enough (fleece often requires a heavier deposit, whereas thinner ‘fashion’ style garments will often require a far lighter pre-treatment deposit).

BRUSH THE GARMENT TO REDUCE FIBRILLATION AND CREATE EVEN COVERAGE: Before heat pressing the garment again, it is important to spread out the pretreat fluid and ensure that the cotton fibers are pressed down into the garment; with all the moving around within the shop, it is easy for those fibers to work their way up (creating a less-than-ideal printing surface). Some people prefer to use various types of foam rollers for this particular step, but we find that the foam rollers do more to hurt the process than to help it – while it may help spread the pretreat fluid evenly, the porous foam tends to lift the fibers more than pushing them down. We use premium Wooster paint brushes for this step, and our experience shows us that the difference between the two is visually noticeable. Using long, even strokes, draw the brush downward across the garment in strips until the entire print area has been covered (it doesn’t hurt to go over the entire area twice, for that matter).

COVER GARMENT WITH QUILON PAPER AND HEAT PRESS: As is typical with most pretreat fluids, you must heat press the garment after applying the chemical to ensure it is dry and flat when you load it onto the DTG printer (there is at least one exception to this rule, which is the Kornit brand which applies the pre-treatment on the machine itself then prints ink directly onto the wet pretreat).
For this process, we cover the entire pre-treated area with a special Quilon paper, then heat press for 20-30 seconds @ 340 degrees Fahrenheit (using HEAVY pressure) – ideally, the pre-treated area will be almost invisible when you are done with this step (if everything was done properly and you haven’t applied too much pretreat to the garment). The time and temperature required for this step is going to vary based on a number of technological and environmental variables (the type and quality of heat press used, as well as your elevation, relative humidity, temperature, etc) – make sure you press the garment long enough to fully cure the pretreat, while avoiding the risk of over-curing it and potentially burning out the active bonding agent that holds the white ink in place; your exact time and temp may vary, slightly!
We have found that the heavier pressure during this step, combined with the brushing from the previous step, seems to do a great job of creating a smooth, ideal printing surface; fibrillation is minimized and we get very little “pitting” in the image. We did an installation for a customer a few months ago who had a pneumatic heat press system, which looked to me to be the best thing I have seen for this step of the process; when the time is right, we will definitely upgrade to a pneumatic heat press system (with a shuttle to improve productivity) that will provide consistent and repeatable results during this critical step.
 REMOVE THE QUILON PAPER FROM TOP TO BOTTOM: Once you have heat pressed the garment and cured the pretreat fluid, you should carefully remove the Quilon paper by pulling from the top to the bottom; this helps ensure that you are not pulling fibers back up from the surface of the garment, which is easily possible when lifting from the bottom. Start at the top and gently pull the paper down in a smooth, even manner;
if there is any resistance when taking the Quilon paper off of the garment, it sometimes helps to press the garment without any paper for an additional 10 seconds – this will ensure that the PT is dry, and will push down any fibers that might have been pulled up when you removed the Quilon paper. This step is not always necessary.
 VOILA! YOUR GARMENT IS NOW READY TO PRINT! Once you have pressed the pretreat fluid, your garment is ready for printing and can be loaded immediately onto the platen for DTG printing. You can load the garment straight from the heat press to the DTG printer, or you can stack the pre-treated garments for later printing.
Many people ask how long they can let their garments sit after they’ve been pre-treated; while we have seen some garments boxed for 2-3 months prior to actually printing (with no negative effect on print quality), it is important to ensure that they will not be shuffled around an excessive amount of times, due to the fact that you don’t want to raise the fibers on the print surface or cause any undue static electricity on the fabric, as both these things can easily reduce the overall print quality.
SOME IMPORANT THINGS TO CONSIDER:
Below are some critical tips and tricks that we have discovered or learned over the last several years; we are constantly learning new tricks, so of course we will keep you posted if we find new information that will help the general public.
Although adding an excessive amount of pretreat fluid to a garment can certainly result in a vibrant, amazing print from your DTG printer, we caution you not to overdo it! Too much pre-treatment actually creates more of a barrier than a bonding surface, and while the print will look great right off the press it will almost certainly flake and peel off in the first wash (you’ll know it when you see it – the ink will literally peel off in large, connected areas; it’s like peeling the shell from a hard boiled egg). If a garment is pre-treated well but then not cured properly, the image would experience noticeable fading after the first wash, and there would most likely be areas where slight flaking is evident; however, in the case of too much pretreat there will be little time for fading to occur, as much of the image will be destroyed right away in the first wash.
If you add too little pretreat fluid, the print will look faded and splotchy, regardless of how well your DTG printer is operating. Even the best white ink printed at the best possible settings will look like garbage if your pre-treatment layer is not done properly! Practice this step until you have become an expert, and your time will be well spent.
Crank the pressure up as much as possible when actually curing the pretreat fluid on the garment – you can reduce the pressure significantly for the actual curing of the printed image (not shown in this brief tutorial), or use a separate heat press altogether. A pneumatic heat press will provide more consistent, even pressure, without the need to work extra hard opening and closing a high-pressure heat press.
When manually pre-treating a garment, take care not to spray too much on the seams or sleeve-lines – since these areas are raised slightly more than the body of the garment, they will receive slightly greater pressure under the heat press, which could ultimately cause light white pretreat marks to appear on these areas (sometimes they will show up as light white marks on the garment, while other times they will manifest as a mildly reflective sheen that looks different than the rest of the garment). Of course this effect will be less noticeable after the first wash cycle, but the best way to control this is to avoid spraying the sleeves / seams as much as possible.
Related Products
$99.99


$5